Photo noise is the digital version of static — those random specks of grain that creep into images, especially in low-light environments or when shooting with older gear. It’s the visual clutter that stands between you and a crisp, polished shot. And let’s face it: noisy images are frustrating. They weaken your visuals, dilute detail, and can make even your best shots look amateur.
Whether you’re editing product photos, fine-tuning content for socials, or trying to breathe new life into archival images, tackling noise is a must. The good news? You don’t need Photoshop wizardry or expensive software suites to fix it. Upscale.pro offers a fast, free, AI-based solution that strips out the noise and restores clarity — all in your browser.
This guide breaks down how to remove photo noise using Upscale.pro, from start to finish, plus tips to get the most out of your edits.
What Causes Noise in Photos?
Before we jump into the how-to, let’s quickly go over why photo noise happens. Most of the time, noise appears when the camera sensor is under stress — either from poor lighting or being pushed beyond its limits.
Common culprits include:
- Low-light conditions: When there’s not enough light, your camera compensates by increasing sensitivity, often at the cost of clean pixels.
- High ISO settings: ISO boosts the signal captured by the sensor — but it also boosts noise. The higher the ISO, the more grain you’ll see.
- Smaller or outdated sensors: Entry-level or older cameras typically introduce more noise, especially in shadows or dark areas.
- Compression artifacts: Saving images in lossy formats like JPG can also introduce texture-like noise, especially after multiple edits or resaves.
While some photographers embrace a bit of grain for artistic reasons, most of the time it’s just unwanted interference. That’s where Upscale.pro comes in.
Why Choose Upscale.pro for Noise Reduction?
Upscale.pro isn’t just another photo editor. It’s a browser-based AI tool built for image enhancement — with denoising baked into its core features.
Here’s what makes it worth your time:
✅ AI-Driven Clarity
The platform uses advanced machine learning models to detect and remove visual noise. Instead of applying a basic blur or filter, it understands the structure of your image — where details should stay sharp and where noise needs to be eliminated.
✅ Fast, Browser-Based, and Free
There’s no software to install, no subscriptions to juggle, and no learning curve. Upload an image, click a button, and within seconds, your photo comes back clearer.
✅ Preserves Natural Texture
Unlike some tools that over-smooth everything into a plasticky mess, Upscale.pro keeps important textures — like skin, hair, and fabric — intact. That’s crucial for portraits, product shots, and anything meant to look natural.
✅ Works with Multiple Formats
JPG, PNG, and WebP are supported. Whether you’re uploading smartphone snaps or digital art, Upscale.pro is built to handle it.
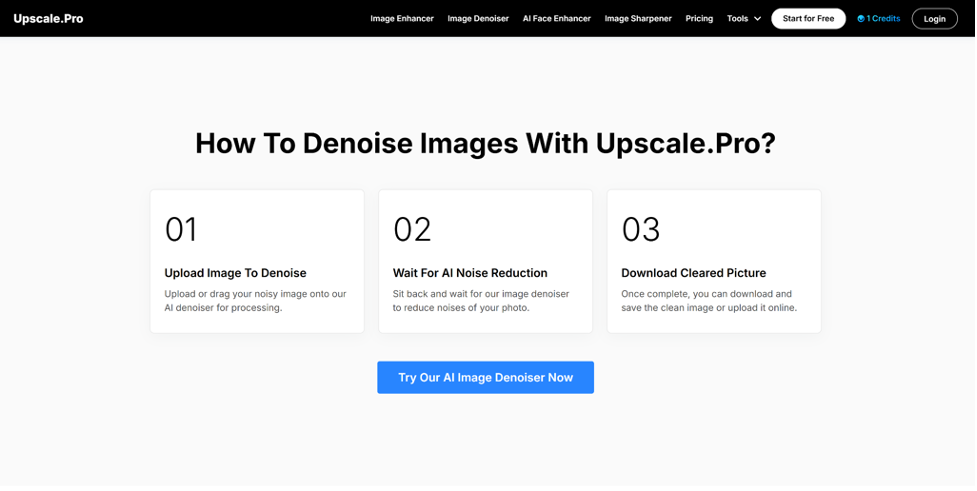
Step-by-Step: How to Remove Noise from Photos with Upscale.pro
Ready to get started? Here’s how to clean up your images using Upscale.pro’s denoising feature.
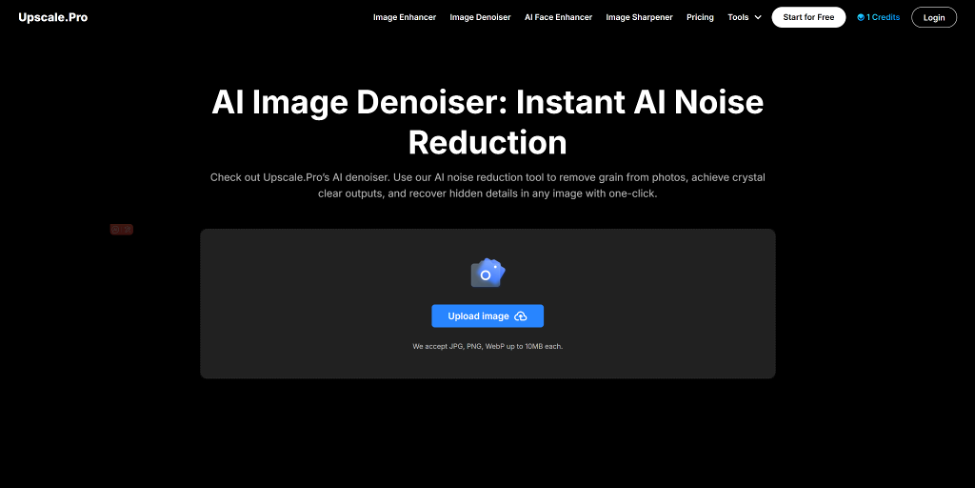
Step 1: Open Upscale.pro in Your Browser
Head to Upscale.pro using any modern browser. Since the tool is fully web-based, it works on both desktop and mobile — no apps or downloads needed.
Step 2: Upload the Noisy Photo
On the main interface, click the upload button. Select the image file you want to fix. Remember that the platform currently supports images up to 10MB in size.
Pro Tip: For best results, try to upload the highest-quality version of the image you have. Compression and low resolution can limit how much detail the AI can recover.
Step 3: Choose the ‘Image Denoiser’ Tool
After uploading, you’ll be prompted to select from Upscale.pro’s enhancement features. Choose the “Image Denoiser” — this is specifically engineered to detect and eliminate grain, artifacts, and digital noise.
Behind the scenes, the AI will scan your image, isolate the noisy regions, and intelligently reconstruct a smoother version of the same image — without blurring out the detail.
Step 4: Let the AI Process Your Image
Once you’ve selected the denoiser, Upscale.pro will do its thing — no input needed. Processing usually takes under 30 seconds, depending on your image size and resolution.
You won’t need to tweak any sliders or settings. The AI handles all the heavy lifting, which is ideal if you’re not a photo editing pro.
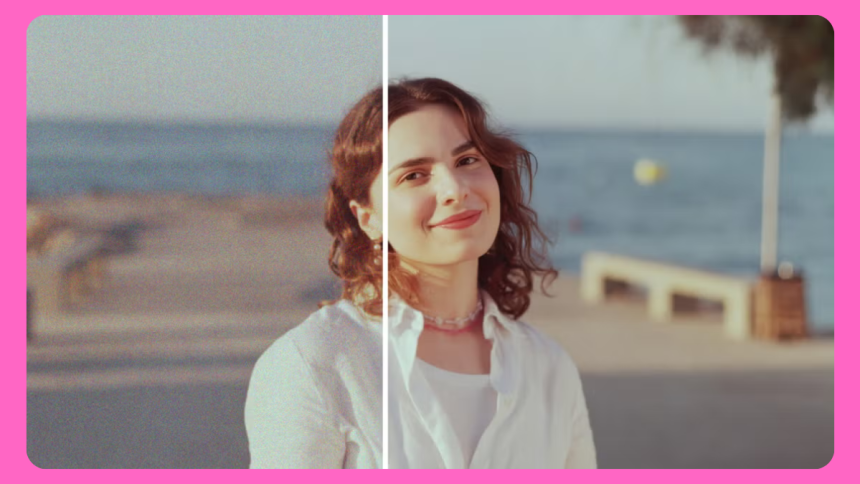
Step 5: Preview the Results and Download
When the process is complete, you’ll see a side-by-side comparison of your original and the enhanced version. Zoom in to examine the difference — especially in shadow areas, skin texture, and fine details.
Happy with the result? Click download to save the denoised image directly to your device.
Pro Tips for Cleaner, Sharper Photos
Upscale.pro is powerful, but you’ll get the best outcome by following a few smart practices:
- Avoid reprocessing the same image multiple times. Overprocessing can lead to unnatural results.
- If you’re editing a batch of images, use the batch upload feature — it applies consistent enhancement settings across all files.
- Don’t upscale and denoise at the same time if quality is critical. Do one pass at a time for better control over the final output.
- Pair it with Upscale.pro’s AI Sharpener for even better results on soft or slightly blurry images.
Other Enhancement Features Worth Exploring
While denoising is a key strength, Upscale.pro offers a whole toolkit for image improvement:
- Image Upscaler – Scale up your image up to 6× its original resolution without quality loss.
- AI Sharpener – Recover focus in images that look slightly out-of-focus or soft.
- Photo Restoration – Ideal for old, damaged, or faded images that need a second life.
- HD Image Converter – Convert standard-res photos to high-definition, perfect for digital signage or large prints.
It’s a full ecosystem built around clarity, and it works surprisingly well — especially for a free tool.
Who Should Be Using Upscale.pro for Denoising?
You don’t have to be a pro photographer to benefit. Here’s who’s using Upscale.pro to clean up their shots:
- Online sellers polishing product shots that look too grainy.
- Influencers and content creators refining social media visuals.
- Photographers working with older gear or challenging lighting.
- Businesses updating their websites or marketing collateral with clean, professional images.
- Archivists or hobbyists restoring scanned photos or historical prints.
Basically, if image quality matters to your work, this tool is relevant.
The Case for AI Tools Like Upscale.pro
Traditional noise removal in software like Photoshop requires hands-on adjustments — threshold tuning, masking, and a lot of back and forth. For most people, that’s time-consuming and complicated.
With Upscale.pro, you get:
- One-click simplicity
- Consistent results
- Zero cost
- No learning curve
That’s the power of AI: it takes the guesswork out of enhancement and delivers cleaner, sharper images in seconds.
Say Goodbye to Grain
Noise doesn’t have to ruin your shots. With tools like Upscale.pro, anyone — from pros to everyday users — can clean up images with just a few clicks. Its denoising feature is fast, intuitive, and genuinely effective at preserving details while eliminating distractions.
So the next time you’re stuck with a noisy photo, skip the complicated edits. Just drop it into Upscale.pro and let the AI take over.
Your images deserve to look their best — and now, they can.
Lynn Martelli is an editor at Readability. She received her MFA in Creative Writing from Antioch University and has worked as an editor for over 10 years. Lynn has edited a wide variety of books, including fiction, non-fiction, memoirs, and more. In her free time, Lynn enjoys reading, writing, and spending time with her family and friends.