Unless you’re a restaurant chef who cooks hundreds of cuts of meat every day and relies on a sixth sense, the most foolproof way to eliminate any guesswork is by using a meat thermometer. With this gadget, you’ll know exactly when to remove your meat from the heat without having to poke and cut it, ensuring it’s perfectly cooked, tender, and juicy. In addition, a meat thermometer can help you prevent foodborne illness, which is why you need to invest in one for your kitchen. Think of it like a culinary GPS. It tells you exactly where you are on the “cooked-to-perfection” map. But just having one isn’t enough. You gotta know how to use it, right? Fortunately, in this post, you can learn what type of meat thermometer you should choose, how to use it, the safe internal temperatures for different types of meat and how often should you calibrate it.
What Type of Meat Thermometer Should I Choose?
Alright, picture this: you’re in the kitchen gadget aisle, surrounded by a sea of thermometers. Don’t panic! Here’s a quick rundown to help you choose the right tool for the job:
Instant-Read Thermometers: These are your everyday heroes. Quick, easy to use, and relatively inexpensive. Perfect for checking the temperature of steaks, chicken breasts, and burgers. Look for digital ones for the most accurate readings.
Oven-Safe Thermometers: These bad boys stick in your meat while it’s cooking in the oven. You can monitor the temperature without opening the oven door and losing heat! Ideal for roasts, whole chickens, and larger cuts of meat.
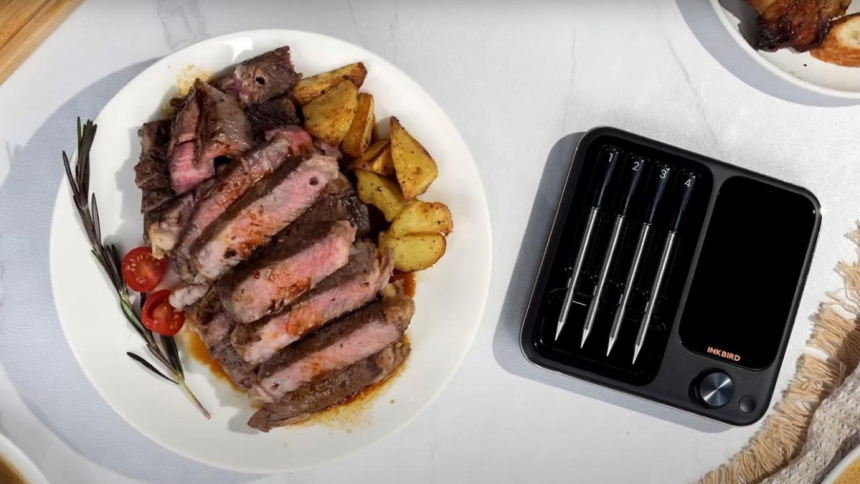
Smart Wireless Thermometers: These connect to a base unit or app via Bluetooth, allowing you to monitor the meat’s temperature remotely. They’re perfect for long cooks like smoking or roasting.
Infrared Thermometers: These fancy gadgets are more for surface temperature. They’re great for checking your grill’s surface, but not ideal for accurately measuring the internal temperature of meat. Think of them as a supporting player, not the star.
How to Use Meat Thermometer?
Okay, you’ve got your thermometer. Now, let’s get cooking! Here’s the step-by-step lowdown:
Placement is Key: This is super important! Insert the thermometer into the thickest part of the meat, avoiding bone, fat, or gristle. These areas can give you inaccurate readings. For poultry, aim for the thickest part of the thigh, away from the bone.
Insert it Deep Enough: Your instant-read thermometer should be inserted at least ½ inch into the meat for accurate results.
Hold Steady: If you’re using an instant-read, hold the thermometer in place for a few seconds until the temperature stabilizes.
Check Multiple Spots (Especially for Large Cuts): To ensure even cooking, check the temperature in a few different spots. If the lowest reading is at the target temperature, you’re good to go!
Carry-Over Cooking is Real: Remember that meat will continue to cook slightly after you remove it from the heat. This is called carry-over cooking. For larger cuts, remove them from the oven a few degrees below your target temperature.
What Temperature Should Meat Be Cooked?
Food safety guidelines are crucial. The following are the minimum safe internal temperatures for various meats, according to the USDA:
- Poultry (Chicken, Turkey, Duck): 165°F (74°C)
- Ground Beef, Pork, Lamb, Veal: 160°F (71°C)
- Beef Steaks, Roasts, Pork Roasts, Chops, Lamb Chops, Roasts: 145°F (63°C) (followed by a 3-minute rest time)
- Fish: 145°F (63°C)
These are minimum temperatures. Remember that personal preference also plays a role in the desired level of doneness, especially for beef. Use a meat thermometer to ensure you reach both safe and palatable temperatures!
Here’s a quick guide to beef doneness:
- Rare: 125-130°F (52-54°C)
- Medium-Rare: 130-140°F (54-60°C)
- Medium: 140-150°F (60-66°C)
- Medium-Well: 150-160°F (66-71°C)
- Well-Done: 160°F+ (71°C+)
How Often Should I Calibrate My Thermometer?
Think of calibration as a check-up for your thermometer. Over time, they can lose accuracy.
How to Calibrate: An easy way to check is the ice water method. Submerge the thermometer in a glass of ice water. It should read 32°F (0°C). If it doesn’t, consult the manufacturer’s instructions for calibration.
How Often: Calibrate your thermometer when you first get it, after you drop it, and every few months. If you use it frequently, calibrate it more often.
The Takeaway
Using a meat thermometer isn’t just about following rules; it’s about empowering yourself in the kitchen. It’s about knowing you’re serving food that’s both safe and delicious. So, ditch the guesswork, grab your thermometer, and get ready to cook with confidence! Your taste buds (and your dinner guests!) will thank you.
Lynn Martelli is an editor at Readability. She received her MFA in Creative Writing from Antioch University and has worked as an editor for over 10 years. Lynn has edited a wide variety of books, including fiction, non-fiction, memoirs, and more. In her free time, Lynn enjoys reading, writing, and spending time with her family and friends.