Ever wondered why your car’s engine doesn’t run as smoothly as it used to? One of the simplest yet most important maintenance tasks you can do is changing your oil. Fresh oil lubricates the engine, reduces friction, and helps prevent costly repairs. The good news? With a little guidance, you can change your oil yourself and save money while keeping your car running at its best.
In this guide, we’ll walk you through the step‑by‑step process, share tips to make it easier, and highlight common mistakes to avoid. And if you prefer professional assistance at any point, finding a trusted Oil Change Houston service can help ensure the job is done correctly and safely.
Why Changing Oil Matters
Your engine is made up of hundreds of moving parts, and oil keeps everything running smoothly. Over time, oil becomes dirty and loses its ability to lubricate effectively. Neglecting oil changes can lead to:
- Increased engine wear and friction
- Reduced fuel efficiency
- Overheating or engine damage
Keeping up with oil changes isn’t just about maintenance—it’s about protecting your investment and ensuring your car performs at its best. If you’re unsure about timing or need professional assistance, searching for a trusted Oil Change Near Me can help you stay on schedule and keep your engine running smoothly.
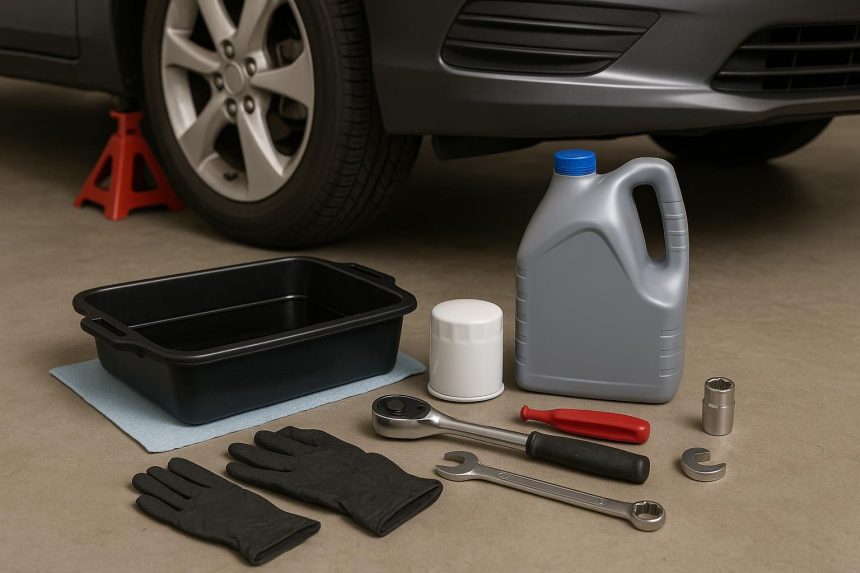
What You’ll Need
Before you start, gather all the necessary tools and materials. Being prepared makes the process faster, safer, and less messy.
- Engine oil (check your owner’s manual for type and quantity)
- Oil filter (specific to your vehicle model)
- Oil filter wrench
- Socket wrench or spanner
- Oil drain pan
- Funnel
- Jack and jack stands or ramps
- Gloves and rags
- Safety glasses
Having everything ready before you lift the car reduces frustration and helps you stay safe. And if you ever feel unsure about doing it yourself, a trusted Auto Repair Near Me can provide guidance or handle the oil change professionally.
Step 1: Prepare Your Vehicle
Safety first! A stable car is a happy car.
- Park on a level surface and engage the parking brake.
- Turn off the engine and let it cool for 10–15 minutes to avoid burns.
- Raise the front of your car using a jack and secure it with jack stands or drive it onto ramps. Never rely solely on a jack.
These precautions ensure you can work safely underneath your vehicle without risk of slipping or injury.
Step 2: Drain the Old Oil
Say goodbye to dirty oil!
- Position a drain pan underneath the engine’s oil pan to catch the old oil.
- Remove the drain plug using a socket wrench. Be careful—oil may be hot.
- Allow all the old oil to drain completely. This can take a few minutes.
- Once drained, clean the drain plug and replace it, tightening it to the torque specified in your owner’s manual.
Draining completely ensures that no old, dirty oil remains, which could compromise your new oil’s performance.
Step 3: Replace the Oil Filter
A clean filter means a healthy engine.
- Locate the oil filter—refer to your manual if unsure.
- Use an oil filter wrench to loosen and remove the old filter. Be prepared for residual oil to spill.
- Take the new oil filter (with its rubber gasket) and apply a small amount of fresh oil to the gasket.
- Screw on the new filter by hand until snug—avoid overtightening.
Replacing the oil filter with a new gasket prevents contaminants from circulating in your engine and ensures your new oil stays clean longer.
Step 4: Add New Oil
Fresh oil, fresh performance!
- Remove the oil filler cap on top of the engine.
- Using a funnel, pour in the recommended amount and type of new oil.
- Replace the oil filler cap and wipe away any spilled oil.
Adding the correct type and amount of oil is crucial—too little or too much can damage your engine.
Step 5: Check Your Work
Don’t skip this—small checks prevent big problems.
- Start the engine and let it run for a minute. Check for leaks around the oil filter and drain plug.
- Turn off the engine and wait a few minutes. Check the oil level with the dipstick and top off if needed.
This ensures your engine is properly lubricated and leak-free before hitting the road.
Step 6: Dispose of Old Oil Properly
Do right by your car—and the planet.
Used oil is hazardous to the environment. Pour it into a sealed container and take it to a certified recycling center or auto shop that accepts used oil. Never pour oil down drains or on the ground.
Proper disposal protects waterways, soil, and wildlife while keeping you on the right side of the law.
Tips for a Smooth DIY Oil Change
1. Check your owner’s manual
Always consult your vehicle’s owner manual for the recommended oil type, quantity, and change intervals. Using the correct oil ensures proper engine performance and prevents damage.
2. Keep a rag handy
Oil can be slippery and stain surfaces. Having a rag nearby helps you quickly clean spills, wipe hands, and keep your work area safe and tidy.
3. Don’t forget the oil filter gasket
Lubricating the rubber gasket on the new oil filter prevents leaks and ensures a proper seal, helping your engine stay clean and well-lubricated.
4. Consider ramps over a jack
If you’re unsure about working under the car, ramps provide a more stable and safer alternative to a jack, reducing the risk of accidents.
5. Pay attention to oil viscosity
Oil viscosity (e.g., 5W-30, 10W-40) determines how thick or thin the oil is at certain temperatures. Using the correct viscosity keeps your engine properly lubricated in different climates and driving conditions.
6. Take your time and stay organized
Planning ahead, having all tools ready, and following each step carefully makes the oil change process faster, safer, and more reliable.
When to Seek Professional Help
While DIY oil changes are straightforward for most cars, some vehicles have tight spaces, complex filters, or require specific torque settings. If you’re unsure, it’s better to visit a trusted mechanic for an oil change service. Professionals can also check for additional issues like worn filters, leaks, or engine components while changing your oil.
Keep Your Engine Happy
Regular oil changes are one of the easiest ways to extend the life of your engine and avoid costly repairs. Whether you do it yourself or use a professional service, staying on top of oil maintenance ensures your car runs efficiently, quietly, and safely. A little care today can prevent big problems tomorrow.
Lynn Martelli is an editor at Readability. She received her MFA in Creative Writing from Antioch University and has worked as an editor for over 10 years. Lynn has edited a wide variety of books, including fiction, non-fiction, memoirs, and more. In her free time, Lynn enjoys reading, writing, and spending time with her family and friends.