Introduction: Why Valve Cover Gasket Replacement for 7.3 Powerstroke Matters
The 7.3 Powerstroke is widely regarded as one of the most dependable diesel engines ever built. However, even this legendary workhorse has its maintenance hurdles, with leaking valve cover gaskets (VCGs) being a frequent concern.
A leaking VCG is more than just a cosmetic mess. On the 7.3L, these gaskets integrate the wiring harnesses for the fuel injectors and glow plugs. A failure here can lead to significant oil loss or, even worse, electrical shorts that cause engine misfires.
Fortunately, replacing the 7.3 PowerStroke valve cover gaskets is a manageable DIY project for those with basic mechanical skills. This tutorial will walk you through every step of the process.
Tools and Parts Needed for the Job
Before you set the first bolt, have everything you will need. It is annoying to have to run to the parts store in the middle of the job with a disassembled engine.
Basic Hand Tools and Safety Equipment
You will need a set of metric sockets (8mm, 10mm, 13mm, and 15mm), a ratchet, extensions, a universal joint, a flat-blade screwdriver, and a torque wrench. A pick set or gasket scraper helps remove old gasket material.
Wear nitrile gloves to keep oil off your hands, and safety glasses to keep debris out of your eyes. A headlamp or shop light is priceless for seeing the rear valve cover bolts. Finally, have rags and brake cleaner on hand to degrease the sealing surfaces.
Choosing the Correct Replacement Gasket
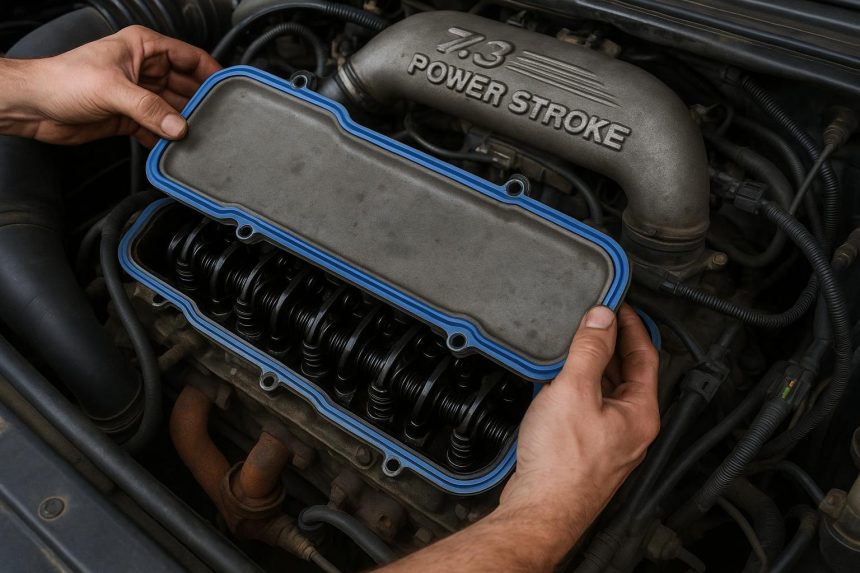
Not all valve cover gaskets are created equal. The 7.3 Powerstroke features a combination gasket that seals both the injector wiring harness pass-throughs and the valve cover to the head. You must have a complete set that includes a perimeter gasket and four injector wiring grommets per side.
Use a high-temperature silicone or Viton gasket instead of a low-quality rubber one; the heat of a diesel engine will soon wear out inferior materials. To ensure an effective replacement, find a suitable 7.3 Powerstroke valve cover gasket that includes everything you need for one or both banks.
Step-by-Step 7.3 Diesel Old Gasket Removal Process
You have your tools ready, and with this systematic approach, you will be able to remove the old leaking gasket.
Preparing the Engine Bay
Park your truck in a level area and let the engine cool down thoroughly. Hot engine parts and oil can cause burns. Disconnect both negative battery cables to prevent accidental engine cranking or electrical damage while working around the injector harness.
Remove any aftermarket parts (intake, charge pipes, or wiring looms) that block access to the valve covers. On the passenger side, the air intake duct may need to be moved. The driver side has tight fuel filter lines and the housing.
Removing Covers, Connectors, and Old Gasket
First, unbolt the engine cover. Then, working one side at a time, remove the injector wiring harness connectors on the valve cover. All connectors have a locking tab—push the tab to unlock.
Clean the bolts that join the valve cover. There are typically 8 bolts per cover; note any longer bolts used for brackets. Lift the valve cover straight up.
The old gasket may be stuck to the cover or the cylinder head. Clean both surfaces with your gasket scraper so that all old gasket material is removed without scratching the aluminum head.
Installing the New Gasket on the 7.3 Powerstroke Correctly
It is important to install it properly in order to have a leak-free seal that lasts long.
Proper Alignment and Sealing Tips
Clean the valve cover flange and cylinder head sealing surface with brake cleaner and a lint-free rag. All residual oil and old gasket material must be removed. Install the new gasket into the valve cover groove, making sure it is fully seated.
For the injector wiring pass-throughs, press the new rubber grommets into position from the outside of the cover. Apply a small dab of high-temperature RTV silicone at the corners where the valve cover meets the front timing cover. These are common leak points on the 7.3 Powerstroke.
Common Mistakes to Avoid
Do not over-tighten valve cover bolts. The torque spec is only 8 ft-lbs (96 inch-lbs). Over-tightening will deform the valve cover and squeeze the gasket, causing leaks. Always use a torque wrench.
Clean the threads of all bolts before reusing them. Do not reinstall dirty or damaged bolts. Be sure to replace the injector wiring grommets; leaks in this area will drip oil directly onto the exhaust manifold.
Lastly, make sure no wiring is pinched between the cover and the head before final tightening.
Testing for 7.3 Powerstroke Leaks and Finishing the Repair
It is not finished until you have checked the following things.
Reassembly Checklist
Reattach the valve cover bolts in a crisscross pattern to the correct torque. Reconnect all injector wiring harness plugs. Listen for a clicking sound.
Reinstall any intake ducting, the engine cover, and anything else you removed. Reconnect both battery cables. Top up engine oil if needed.
Start-Up Inspection and Road Test
Turn the key to the on position and let the engine idle. Carefully inspect the edges of the valve cover for any new oil leakage. Rev the engine slowly and watch for leaks.
Let the engine reach operating temperature, then take a short test drive. After the drive, place a clean piece of cardboard under the engine and check for drips.
If it is dry, you have succeeded. Recheck the bolts after 500 miles. They may settle slightly, and the retorque must be done gently, always with the engine cold.
Final Thoughts: A DIY Repair That Protects Your 7.3 Engine
Replacing a leaking Powerstroke valve cover gasket is not a complicated task, but it does require patience, cleanliness, and attention to detail. A successful repair prevents oil spills, fire risk, and keeps your engine bay clean.
It also builds your confidence for larger maintenance tasks. While working on the top end, it is a good time to inspect your injector harness, glow plugs, and valve cover wiring for wear. Many owners take this chance to perform other 7.3 diesel engine upgrades.
With the correct parts and a careful approach, your 7.3 will keep providing the reliable service it is known for.
Lynn Martelli is an editor at Readability. She received her MFA in Creative Writing from Antioch University and has worked as an editor for over 10 years. Lynn has edited a wide variety of books, including fiction, non-fiction, memoirs, and more. In her free time, Lynn enjoys reading, writing, and spending time with her family and friends.